This tutorial is aimed to serve as a starter for those who want to use both Qt5 (more precisely, versions Qt5.4+), and OpenSceneGraph (OSG) libraries with a corresponding CMake file. One of the main differences of this tutorial from the official osgviewerQt example is that there will be no timer used to run the Qt application.
All the basic methods like redraw, resizing and events will have to be re-defined within the Qt widget in order to “translate” them into the OSG methods. The redraw will be only made on demand, e.g., when the scene graph changes, or when the mouse moves.
This way of combining the Qt with OSG is most relevant for CAD-like applications when we do not want to have the system to redraw the widget if the user does not interact with it. When I started my work project which is based on CAD concept, I had to use draw on demand technique to connect the Qt interface with OSG backend. This is how this tutorial was born.
This tutorial is planned to include a very detailed explanation of the every step I make. While it seems to be working fine for my current project, do not hesitate to indicate any errors that you think are present (please, leave a comment below, or contact me by email). After all, I am still learning both OSG and Qt and consider myself a beginner.
CMakeLists.txt fileBefore I start any actual coding, I always work on the CMake file. This helps me to define the environment requirements and an initial structure of my project. For this tutorial, the CMake file will be rather simple.
At first we define a project name and set up the cmake minimal version.
cmake_minimum_required(VERSION 2.8.11)
project(qtosg-hello)
We chose the version to be 2.8.11 for a reason: that helps to make sure the Qt5 is integrated correctly, for more details on this you can check the Qt’s official CMake manual. We set up our project name to qtosg.
In order to use signals and slots within Qt, we have to set a corresponding variable, plus, it is recommended to include the current directory:
set(CMAKE_INCLUDE_CURRENT_DIR ON)
set(CMAKE_AUTOMOC ON)
Now it is time to include the necessary Qt and OSG libraries so that we can use them in our program. Let’s assume that our minimal example will require the next Qt components: Core, Gui and OpenGL (for the QOpenGLWidget). As to the OSG components we will include the next node kits: osgDB, osgGA, osgUtil and osgViewer. The cmake’s find_package command will help us with that. The aforementioned command helps to find and use the external libraries as it is explained in the cmake official guide.
find_package(Qt5 REQUIRED COMPONENTS Core Gui OpenGL)
find_package(OpenSceneGraph REQUIRED COMPONENTS osgDB osgGA osgUtil osgViewer)
Assuming all the components are found, we need to add the OSG directories:
include_directories(${OPENSCENEGRAPH_INCLUDE_DIRS})We add all the source files that are going to be used for our program. For this tutorial it will be only one file which will also contain the main() function. After that we are ready to set up our executable.
set(SOURCES
    main.cpp
    )
add_executable(${PROJECT_NAME} ${SOURCES})
The ${PROJECT_NAME} is a cmake variables which was set up when we defined the name of our project. In our case it was qtosg, therefore it will also be the name of the executable.
As a last step for the CMake file, we need to link our executable with the target Qt and OSG libraries so that ld was able to link to them:
target_link_libraries(${PROJECT_NAME}
    ${OPENSCENEGRAPH_LIBRARIES}
    Qt5::Core
    Qt5::Gui
    Qt5::OpenGL
    )
And that is all we need for the CMake file. Surely, a professional CMake file would include many other components such as version checking, cross-platform compiler set up, etc. But we stop here since we are only interested in a basic working example.
Now we are ready to do some coding. At first we create the file vim qtosg.cpp (or use any other editor of your choice), and write down a basic Hello World Qt program:
#include <QApplication>
#include <QMainWindow>
#include <QWidget>
int main(int argc, char** argv){
QApplication qapp(argc, argv);
QMainWindow window;
QWidget* widget = new QWidget(&window);
window.setCentralWidget(widget);
window.show();
return qapp.exec();
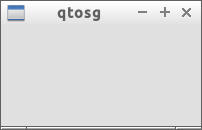
}This piece of code will produce an empty window:
Our next task is to redefine a QWidget so that it uses OSG graphics context and scene elements.
QtOSGWidgetBefore going into implementation details, we should include some Qt and OSG files that will be used further:
#include <QOpenGLWidget>

#include <osg/ref_ptr>
#include <osgViewer/GraphicsWindow>
#include <osgViewer/Viewer>
#include <osg/Camera>
#include <osg/ShapeDrawable>
#include <osg/StateSet>
#include <osg/Material>
#include <osgGA/EventQueue>
#include <osgGA/TrackballManipulator>We will base our QtOSGWidget on the QOpenGLWidget so that to encapsulate the rendering OpenGL procedures (since the OSG is a higher-lever OpenGL API). Our main goal is to design the widget so that the OSG redraws are called based on Qt event processing.
class QtOSGWidget : public QOpenGLWidget{};Within OSG, the osg::Camera class manages the OpenGL graphics context associated with it through the Camera’s method setGraphicsContext(). The graphics context serves to encapsulate information on the way in which scene objects are drawn and render states are applied. While the osg::GraphicsContext is used to represent the abstract graphics context, the virtual class osgViewer::GraphicsWindow - is to represent the abstract graphics window.
In order to integrate the OSG scene graph into our QOpenGLWidget and to get OpenGL support calls directly, we will use an instance of osgViewer::GraphicsWindowEmbedded class (which is a derived from virtual osgViewer::GraphicsWindow).
private:
    osg::ref_ptr<osgViewer::GraphicsWindowEmbedded> _mGraphicsWindow;
    osg::ref_ptr<osgViewer::Viewer> _mViewer;
In short, we will create a QOpenGLWidget-based class that will have some OSG instances to help to associate with the OSG scenes:
The constructor of the widget will contain all of the steps above:
QtOSGWidget(QWidget* parent = 0) :
    QOpenGLWidget(parent),
    _mGraphicsWindow(new osgViewer::GraphicsWindowEmbedded(this->x(), this->y(),
                                                           this->width(), this->height())),
     _mViewer(new osgViewer::Viewer)
    {
        // create a debug scene - cylinder
        osg::Cylinder* cylinder    = new osg::Cylinder( osg::Vec3( 0.f, 0.f, 0.f ), 0.25f, 0.5f );
        osg::ShapeDrawable* sd = new osg::ShapeDrawable( cylinder );
        sd->setColor( osg::Vec4( 0.8f, 0.5f, 0.2f, 1.f ) );
        osg::Geode* geode = new osg::Geode;
        geode->addDrawable(sd);

        // create a main camera and attach a graphics context to it
        osg::Camera* camera = new osg::Camera;
        camera->setViewport( 0, 0, this->width(), this->height() );
        camera->setClearColor( osg::Vec4( 0.9f, 0.9f, 1.f, 1.f ) );
        float aspectRatio = static_cast<float>( this->width()) / static_cast<float>( this->height() );
        camera->setProjectionMatrixAsPerspective( 30.f, aspectRatio, 1.f, 1000.f );
        camera->setGraphicsContext( _mGraphicsWindow );

        // attach a camera to the viewer
        _mViewer->setCamera(camera);
        _mViewer->setSceneData(geode);
        osgGA::TrackballManipulator* manipulator = new osgGA::TrackballManipulator;
        manipulator->setAllowThrow( false );
        _mViewer->setCameraManipulator(manipulator);
        _mViewer->setThreadingModel(osgViewer::Viewer::SingleThreaded);
        _mViewer->realize();

        // set a size of the widget
        this->setMinimumSize( 300, 300 );
}*GL functionsNow if we run our program as it is, it will still render an empty window. It is all because we have to re-define certain QOpenGLWidget’s methods. From the Qt’s manual, we have to re-implements the following methods:
paintGL() to render the OpenGL scene whenever the scene is updatedresizeGL() to set up the OpenGL viewport, projection, etc.initializeGL() to set up OpenGL resources and stateThe graphics window has a frame() method which should be called whenever we need to update the widget class. We will use this method to re-implement the paintGL() method:
virtual void paintGL() {
_mViewer->frame();
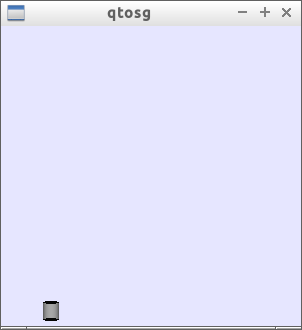
}If we try to compile and run our program at this stage, the scene will indeed be rendered and we will see our cylinder. However, since we did not set up viewport and projection parmeters, it will appear very small in the left lower corner:
Re-implementation of the resizeGL() method where we can set up the necessary parameters will solve this problem. For that we will use a helper method that is contained in graphics window called getEventQueue() to manage GUI events (to read more about graphics window and graphics context, refer to the book OpenSceneGraph: beginner’s guide, chapter 9).
// private method to manage GUI events
osgGA::EventQueue* getEventQueue() const {
osgGA::EventQueue* eventQueue = _mGraphicsWindow->getEventQueue();
return eventQueue;
}
virtual void resizeGL( int width, int height ) {
this->getEventQueue()->windowResize(this->x(), this->y(), width, height);
_mGraphicsWindow->resized(this->x(), this->y(), width, height);
osg::Camera* camera = _mViewer->getCamera();
camera->setViewport(0, 0, this->width(), this->height());
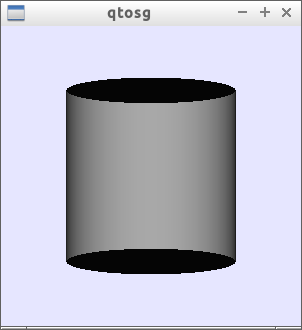
}Now if we render our scene, we will see that the viewport is set up and the cylinder is located at the center of the screen:
We re-implement initializeGL() to define the OpenGL state of the scene:
virtual void initializeGL(){
osg::Geode* geode = dynamic_cast<osg::Geode*>(_mViewer->getSceneData());
osg::StateSet* stateSet = geode->getOrCreateStateSet();
osg::Material* material = new osg::Material;
material->setColorMode( osg::Material::AMBIENT_AND_DIFFUSE );
stateSet->setAttributeAndModes( material, osg::StateAttribute::ON );
stateSet->setMode( GL_DEPTH_TEST, osg::StateAttribute::ON );
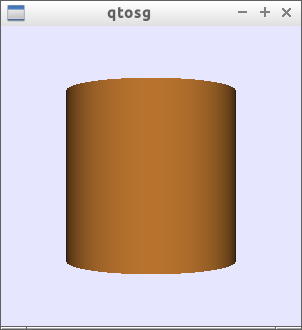
}When we run our program this time, the cylinder renders correctly, without any artifacts:
In this tutorial we demonstrated to how set up your CMake file and then how to prepare your base Qt + OSG class so that to render OSG scenes within Qt widget. The provided material only allows to render a scene without any user interaction, e.g., it is not possible to change the camera view by mouse, even if the osgGA::TrackballManipulator is attached. The reason is because we still have to “connect” the Qt GUI events with OSG events. I am planning to cover this in one of my next tutorials. Go to Part 2.
You can find the code for this tutorial (both parts 1 and 2) on my github repository. Note, the presented code also contains parts of code related to high DPI scaling which can be easily omitted.