The OpenSceneGraph beginner’s guide1 provides an example on how to load and display a photograph as a texture. We took the example as a base so that to be able to use in a CAD-like application which allows simple photo manipulations: moving within 2D plane, scaling, rotation and horizontal and vertical flipping. You can think of any well-known CAD program, e.g., Rhino 3D or SketchUp, and how the uploaded images can be manipulated within CAD settings.
One of the main differences of this tutorial from the base example is that the loaded photograph is loaded to be a stand alone photographic object, and not just-a-texture. Which means it has to maintain width-heigh aspect ratio and be displayed as it looks (not stretched and not inverted) in its native image format such as .bmp or .jpeg, etc. For this purpose we will have to design our own Photo class.
We will start the tutorial from photo upload and display. Further on, we will see how we can change the photo’s parameters so that it can be moved, scaled, rotated or inverted.
Our Photo class is represented by osg::Geometry class that contains osg::Texture2D as an image. We perform 2D texture mapping following the next steps:
osg::Image class to the memory;GL_QUAD geometry object that will represent a Photo class;Photo class.The API of our Photo class will look like following:
class Photo : public osg::Geometry
{
public:
    Photo();
    void loadImage(const std::string& fname);
    osg::StateAttribute* getTextureAsAttribute() const;

    void move(double u, double v);
    void rotate(double angle);
    void flipH();
    void flipV();
    void scale(double times);
    void scaleX(double times);
    void scaleY(double times);

protected:
    void updateVertices();

private:
    osg::ref_ptr<osg::Texture2D> m_texture;
    osg::Vec3 m_center;
    float m_width, m_height;
    float m_angle;
};
For the photo manipulation, we introduce some variables that help to track parameters such as photo’s center 3D location, dimensions, rotation angle along photo’s center. The variable m_texture is to contain the loaded osg::Image data.
The constructor method initializes the private variables. So when we use the Photo class to create a new instance, e.g.,
{
// ...
Photo* photo = new Photo;
// ...*
}
the variable photo is literally empty - there is no texture attached to it. That is why we introduced method loadImage(). Inside there we can read the image and based on its dimensions, initialize the internal parameters - width and height:
osg::Image* image = osgDB::readImageFile(fname);
m_texture->setImage(image);
float aspectRatio = static_cast<float>(image->s()) / static_cast<float>(image->t());
m_width = 1;
m_height = m_width / aspectRatio;
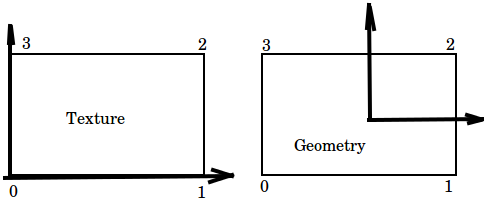
// ...*When performing the texture mapping, it is important to keep in mind what sequence and what direction you go when specifying the vertices for both of the 2D texture and geometrical object. For this tutorial we choose the starting point to be a lower left corner, and the direction to be counter-clockwise:
Based on this principle, we specify the texture coordinates:
osg::Vec2Array* texcoords = new osg::Vec2Array(4);
this->setTexCoordArray(0, texcoords);
double x = m_width;
(*texcoords)[0] = osg::Vec2(0, 0);
(*texcoords)[1] = osg::Vec2(x, 0);
(*texcoords)[2] = osg::Vec2(x, x);
(*texcoords)[3] = osg::Vec2(0, x); // (*
Note: for specifying the x and y coordinate for texture mapping, we only use 1 dimension (in our case it is width). Our guess why we only need one dimension is because of normalization, but we could not find the direct explanation in neither reference book, or source code. Try to play with this part of code (e.g., use m_height as a y coordinate), and see what kind of output will be produced.
We chose GL_QUAD as a primitive of our geometrical object. The vertex specification, as well as vertex calulation for geometrical object is performed in protected method updateVertices(). In this method, not only we have to calculate the coordinates for each vertex based on photo’s center, width, height, rotation angle; but also assign the vertices in the above defined order, starting from the bottom left corner. The code can be compactly written as follows:
void Photo::updateVertices()
{
    osg::Vec3Array* verts = static_cast<osg::Vec3Array*>(this->getVertexArray());
    if (!verts) return;

    (*verts)[0] = m_center +  osg::Vec3(-m_width * std::cos(m_angle) + m_height * std::sin(m_angle), 0,
                                        -m_width * std::sin(m_angle) - m_height * std::cos(m_angle));
    (*verts)[1] = m_center +  osg::Vec3(m_width * std::cos(m_angle) + m_height * std::sin(m_angle), 0,
                                        m_width * std::sin(m_angle) - m_height * std::cos(m_angle));
    (*verts)[2] = m_center +  osg::Vec3(m_width * std::cos(m_angle) - m_height * std::sin(m_angle), 0,
                                        m_width * std::sin(m_angle) + m_height * std::cos(m_angle));
    (*verts)[3] = m_center +  osg::Vec3(-m_width * std::cos(m_angle) - m_height * std::sin(m_angle), 0,
                                        -m_width * std::sin(m_angle) + m_height * std::cos(m_angle));

    this->dirtyDisplayList();
    this->dirtyBound();
}
Note: the internal variables m_width and m_height represent half-width and half-height correspondingly.
By making the geometrical object’s vertices to be calculated based on rotation, width, height and image center, all we need to do when changing those parameters, is to call updateVertices(), and it will re-calculate the vertices. We are not going to provide the step-be step mathematics behind those functions since they are pretty basic2. The main principles of the geometrical transforms are displayed below on the figure:
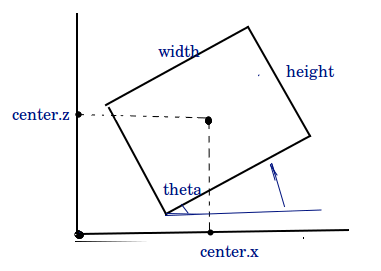
Note: We place our geometrical object within plane XZ. That is why its center is defined by coordinates in X and Z.
The initialization of all other components is straightforward. Refer to the accompanying code for implementation details.
Since we defined our Photo to have a parametric representation, it is especially easy to introduce the changes into those parameters.
The movement is defined by a parameter m_center. If we are given move-to coordinates \([u, v]\), then we use simple assignment operator:
void Photo::move(double u, double v)
{
    m_center = osg::Vec3f(u,0,v);
    // for incremental operator use
    // m_center = m_center + osg::Vec3f(u,0,v);
    this->updateVertices();
}We perform scaling by changing the Photo’s width and height:
void Photo::scale(double times)
{
    m_width *= times;
    m_height *= times;
    this->updateVertices();
}
In code above the scaling is defined to be proportional, i.e., the width and height change the same scale. It is straightforward to scale only one of the dimensions by multiplying only one of them. Refer to accompanying code sample for non-proportional scaling.
The flipping procedure does not look as straightforward as other operators. In simple words, flipping is supposed to behave like a mirror by providing a reflection of an original object. The reflection can happen in two direction: vertically and horizontally.
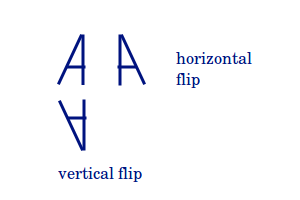
For Photo class the flipping is done by swapping the sequence of texture vertices. The horizontal flip is then implemented as:
void Photo::flipH()
{
    double x = m_width;
    osg::Vec2Array* texcoords = static_cast<osg::Vec2Array*>(this->getTexCoordArray(0));
    if (!texcoords) return;

    std::swap((*texcoords)[0], (*texcoords)[1]);
    std::swap((*texcoords)[2], (*texcoords)[3]);

    this->dirtyDisplayList();
    this->dirtyBound();
}
The vertical flip is implemented similar way, but we swap the coordinates differently. Refer to the accompanying code for more details.
Given an incremental angle, we add it to our private instance of angle:
void entity::Photo::rotate(double angle)
{
    m_angle += angle;
    this->updateVertices();
}We add a customized osgGA::GUIEventHandler that triggers different methods to change an instance of Photo variable. We used some fixed values to perform movement, scale and rotation. To trigger different methods that change our Photo we use keyboard keys, for example, ‘m’ to move, ‘r’ to rotate, ‘s’ to scale, ‘h’ to flip horizontally, ‘v’ to flip vertically. A usage example for movement operator would be:
m_photo->move(0.2, 0.2);This tutorial provides an example of how to design your ownPhoto class that behaves like a photographic object on 3D scene. Thanks to its parametric representation, it is possible to introduce changes like movement to another location, scaling, flipping and rotation.
Check my gist for this specific tutorial.
OpenSceneGraph: beginner’s guide, Chapter 6: How to add in textures and set texture coordinates of geometries. ↩